
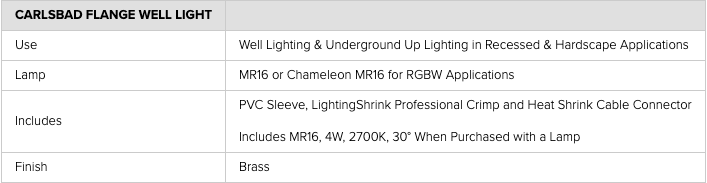
Carlsbad Flange Well Light by Brilliance Metal Works
January 20, 2024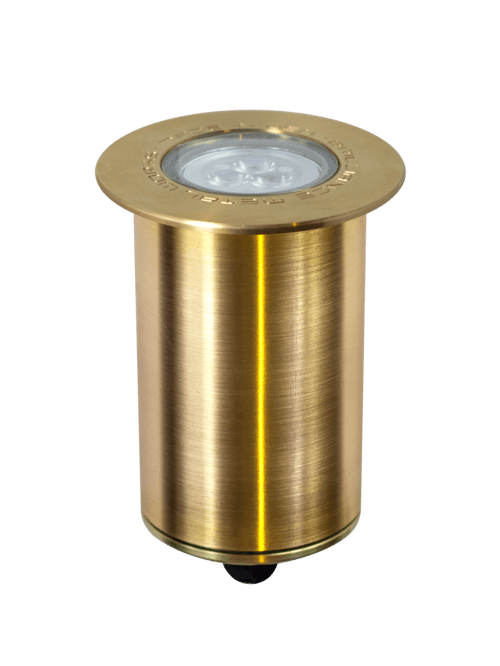
CARLSBAD FLANGE
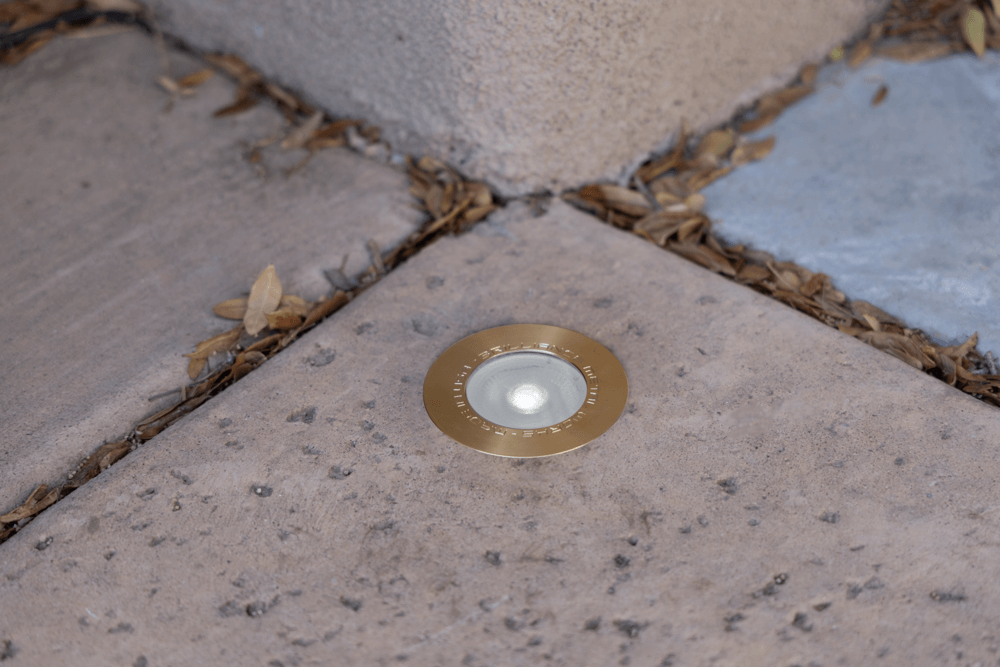
The Carlsbad Flange Well Light is ideal for recessed and hardscape applications like being core drilled into concrete, pavers, and driveways. (The recommended core drill size is 2.75 inches.) The Carlsbad Flange is fitted for any MR16 lamp and comes to life with the Brilliance Chameleon MR16. Like the original Carlsbad fixture, the flat glass top comes in a brass finish.
Fixture Finish
The Carlsbad Flange fixture is available in brass. Machined brass offers a beautiful living finish that weathers over time to a unique patina.
To clean the fixture, periodically wipe it down with a mild soap and water.
INSTALLATION
INSTALLING THE LAMP
-
Remove the rear cap and pull out the spring.
-
Set the MR16 on top of the spring and plug into the socket.
-
Insert this assembly into the fixture body with the front of the lamp toward the lens.
-
Screw the back cap onto the fixture body and hand tighten.
INSTALLING THE FIXTURE: GROUND MOUNT WITH SLEEVE
-
Dig a hole in the ground approximately 6” wide by 10” deep.
-
Connect the power cable to the fixture, leaving 2’ landscape cable coiled in the bottom of the fixture for future service.
-
Pour 8” pea gravel in the hole.
-
Place the sleeved fixture in the center of the hole.
-
Add more pea gravel to fill the hole 1” before the fixture lip. This allows for proper drainage around the fixture.
-
Apply glass wax on top of the lens to protect against standing water.
INSTALLING THE FIXTURE: CORE DRILLING WITH SLEEVE
-
Core drill a hole 2 3/4” wide by 10” deep into concrete or hardscape. Be sure there is room in the core drilled hole for proper drainage.
-
Attach the fixture cable to the main cable with the Lighting Shrink cable connection provided.
-
Insert the fixture into the sleeve and drop the fixture and sleeve into the core drilled hole.
-
Apply glass wax on top of the lens to protect against standing water.
INSTALLING THE FIXTURE: GROUND MOUNT WITHOUT SLEEVE
-
Dig a hole in the ground approximately 6” wide by 10” deep.
-
Connect the power cable to the fixture, leaving 2 feet of landscape cable coiled at the bottom for future service.
-
Pour 8” pea gravel in the hole.
-
Place the fixture in the center of the hole.
-
Add more pea gravel to fill the hole 1” before the fixture lip. This allows for proper drainage around the fixture.
-
Apply glass wax on top of the lens to protect against standing water.
INSTALLING THE FIXTURE: CORE DRILLING WITHOUT SLEEVE
-
Core drill a hole 2 1/4” wide by 10” deep into concrete or hardscape. Be sure there is room in the core drilled hole for proper drainage.
-
Attach the fixture cable to the main cable with the Lighting Shrink cable connection provided.
-
Drop the fixture into the core drilled hole.
-
Apply glass wax on top of the lens to protect against standing water.
INSTALLING THE FIXTURE: INTO POURED CONCRETE
-
Dig a hole in the ground approximately 6” wide by 10” deep from the top of the concrete level.
-
Use an electrical sweep with ridged conduit or flexible conduit to allow the main cable to reach the PVC sleeve.
-
Fill the hole with a minimum of 4” gravel underneath where the fixture will be placed. Be sure not to get any gravel in the conduit.
-
Create a standoff between the ground and the PVC sleeve using 2 ¼” X 12” piece of rebar and duct tape. Tape the rebar 1” down on each side of the PVC sleeve. For greater strength, use both tape and a 3” stainless steel hose clamp.
-
Insert crumpled newspaper into the sleeve to prevent concrete from filling into the sleeve.
-
Insert the PVC sleeve at location of the fixture above the conduit with two rebar stems down into gravel to hold sleeve in place.
-
Check that sleeve is level with the grade.
-
Pour the concrete level to the top of the PVC sleeve.
-
When the concrete hardens, pull the newspaper out from the sleeve.
-
Connect the fixture wires to the main cable using the Lighting Shrink connection provided.
-
Be sure to check for proper level and height of fixture, and then apply grout if necessary.
-
Insert the fixture into the sleeve.
-
Apply glass wax on top of the lens to protect against standing water.